
Let's be honest, your couch is probably the hardest-working piece of furniture in your home. It's the hub for movie nights, the scene of spilled snacks, and the favorite napping spot for pets and people alike. But all that love means it can start looking a little worse for wear.
This guide is your playbook for getting that sofa back to its former glory. We're skipping the generic, confusing advice and getting straight to practical, real-world techniques that actually work. A little bit of consistent care goes a long way—it's much easier than waiting for a major spill disaster to strike.
The Secret is a Simple Maintenance Routine
You don't need to dedicate an entire weekend to a massive cleaning effort every year. The real secret to a couch that always looks fresh is building a few small habits into your weekly routine. This approach prevents the slow buildup of dirt, dust, and allergens that can make upholstery look dull and dingy.
This infographic really nails the three most important things you can do.
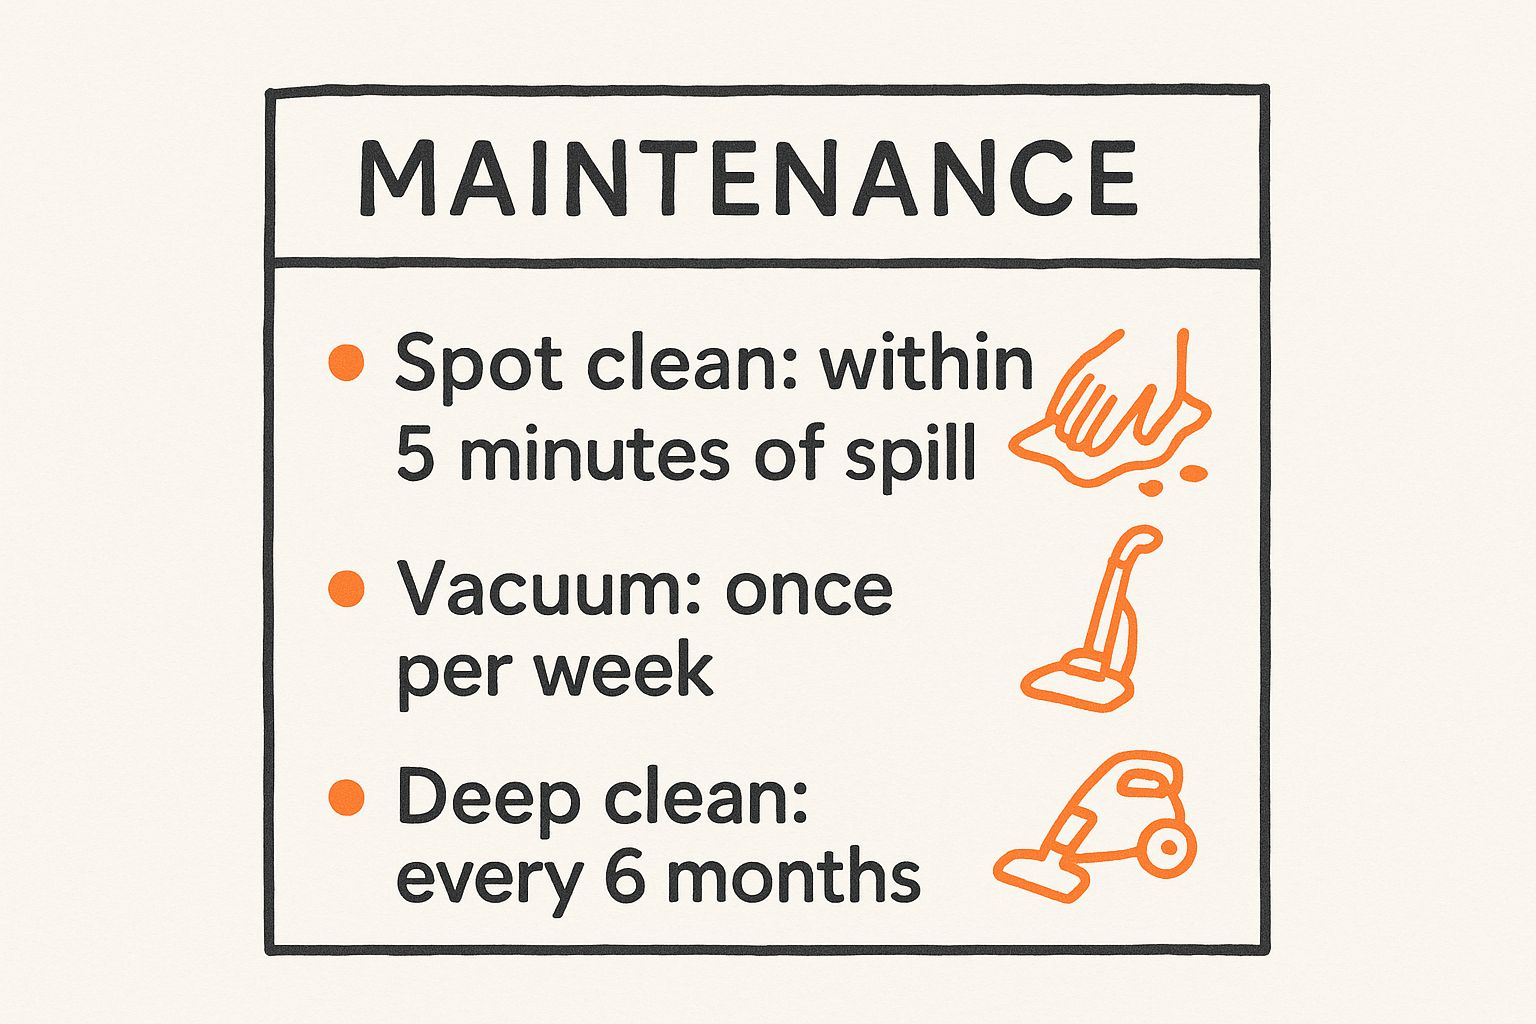
As you can see, it's a simple but powerful cycle: tackle spills right away, give it a good vacuum weekly, and plan for a deeper clean twice a year.
Why Bother with Upholstery Care?
Keeping your couch clean is about more than just looks—it's a big deal for your home's overall hygiene and air quality. Sofas are like giant filters, trapping dust, pet dander, pollen, and all sorts of other allergens that can make you sneeze and sniffle. A regular cleaning pulls all that gunk out, creating a much healthier space for you and your family.
The numbers don't lie. The global market for carpet and upholstery cleaning hit about $55.16 billion in 2022 and is expected to climb to nearly $83.5 billion by 2030. You can learn more about the upholstery cleaning market growth from market analysts.
That's a huge jump! It just goes to show that more and more people are realizing that a truly clean home goes beyond just wiping down surfaces. Whether you do it yourself or call in the pros, keeping your furniture clean is an investment in your home's health.
Decoding Your Couch Fabric and Cleaning Codes
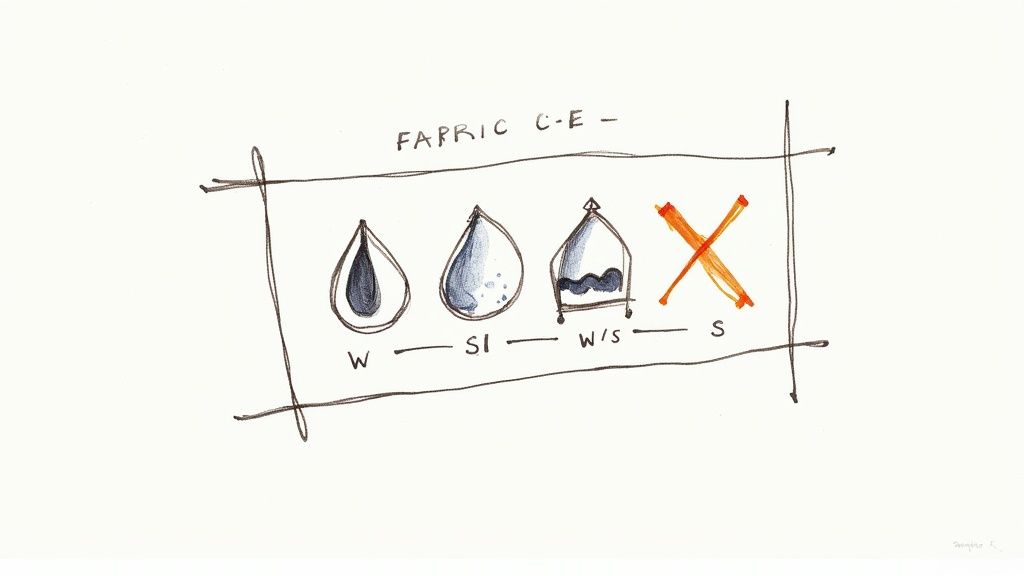
Before you even think about mixing up a cleaner, your first job is to play detective. Tucked away somewhere on your couch, usually under a cushion or along a seam, is a small tag. This little piece of fabric is the single most important key to cleaning your upholstery without creating a disaster.
Seriously, ignoring this tag is like trying to bake a cake without the recipe. You might get lucky, but you’re far more likely to end up with a mess. This tag tells you the fabric type and, most critically, the cleaning code that dictates exactly what you can—and can't—use on it.
Uncovering the Manufacturer's Tag
Finding this tag can sometimes feel like a treasure hunt. I always tell people to start by flipping over the main seat cushions. Not there? Run your hand along the seams of the couch's frame, especially near the back or underneath the arms. It’s usually a small, white fabric tag that’s easy to miss if you aren't looking for it.
Once you’ve got it, you’re looking for a one or two-letter code. This isn’t just a friendly suggestion; it’s a direct order from the people who made your couch. Following it is the difference between a refreshed sofa and one with permanent water rings or faded color. The entire professional sofa cleaning industry, valued at around USD 7.23 billion globally in 2023, is built on experts understanding these codes. You can achieve the same great results at home just by paying attention to that tag.
Understanding Upholstery Cleaning Codes
This quick guide will help you decipher the cleaning codes you find on your couch's tag. These letters tell you exactly which cleaning agents are safe for your specific fabric. Using the wrong one can lead to shrinking, discoloration, or those dreaded permanent water stains.
| Code | Meaning | Safe Cleaning Method |
|---|---|---|
| W | Water-Based | This is the most common and user-friendly code. It means you can safely use water and water-based cleaning solutions, making our citrus method a perfect fit. |
| S | Solvent-Only | Water is the enemy of these fabrics and will leave stains. You must use a dry-cleaning solvent or a completely water-free cleaner. |
| W/S | Water or Solvent | You've got options here. Both water-based cleaners and dry solvents are safe. It gives you more flexibility, but you should still spot-test first. |
| X | Vacuum Only | The most delicate of them all. This code means no water and no solvents. The only safe method is vacuuming or light brushing. For any stains, you absolutely must call a professional. |
Remembering these codes is crucial. Never assume your new couch has the same cleaning code as your old one. Manufacturers use a huge variety of fabrics, from durable microfibers (often 'W') to delicate velvets (often 'S'). Always check the tag, every single time.
This knowledge is the foundation for any successful cleaning project. For example, understanding why citrus-based cleaning is so effective is great, but it’s geared toward fabrics that can handle water. Trying to use even the best water-based cleaner on an 'S' code couch can ruin it instantly. Taking a moment to check that little tag protects your furniture investment for years to come.
Assembling Your Cleaning Toolkit
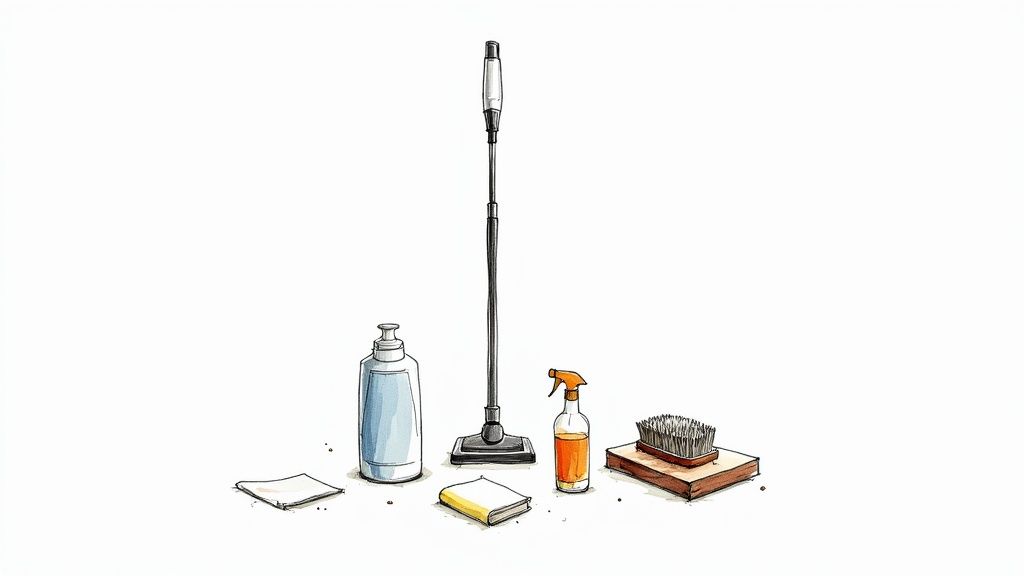
Before you dive into cleaning your couch upholstery, you’ve got to get your supplies in order. Having everything you need within arm's reach turns a frustrating scramble into a smooth, satisfying job. Think of it as your mission prep—it just makes everything go faster and gets you a much better result.
A well-stocked toolkit means you can go from prepping the surface to deep cleaning without having to stop and hunt for something.
The Non-Negotiable Basics
Some tools are just essential for a real, deep clean. Without them, you're basically just pushing dirt around and leaving the deep-down grime behind. Getting this part right sets the stage for everything else.
- A Quality Vacuum: Your regular floor vacuum is a start, but the real game-changer is the upholstery attachment. This thing is designed to get right into the fabric fibers and pull out all the dust, pet hair, and crumbs that a normal vacuum head just skims over.
- Microfiber Cloths: Forget old t-shirts or paper towels. Microfiber cloths are super absorbent and, most importantly, they don't leave lint behind. You’ll want at least three on hand: one for applying your cleaner, one for blotting up the mess, and a dry one for the final wipe-down.
- Soft-Bristled Brush: This is what you’ll use to gently work the cleaner into the fabric. You need something soft enough that it won't damage the fibers or cause pilling. An old, clean toothbrush works in a pinch for tiny spots, but a bigger upholstery brush is better for the main event.
A thorough vacuuming session is the most important first step you can take. Seriously. You're not just getting rid of loose crumbs; you're stopping surface dirt from turning into a muddy mess the second you add a liquid cleaner. Don't rush this part.
Your DIY Cleaning Solutions
You don't need to run out and buy a bunch of expensive, chemical-filled products. Simple stuff you probably already have at home can create some seriously powerful and safe cleaners for your couch. It all depends on the cleaning code.
For our citrus-based method, having the right ingredients ready to go is key. You can learn more about mixing up a great non-soapy citrus cleaning solution that won't leave behind a sticky residue. This approach works wonders for fabrics with a 'W' or 'W/S' code.
Now, if you're dealing with tougher, oil-based stains on an 'S' code fabric, you need a different plan. A small amount of rubbing alcohol or a special dry-cleaning solvent on a cloth is the way to go here. Just make sure you're working in a well-ventilated area when you use any kind of solvent. Having both types of solutions ready means you're prepared for whatever your couch throws at you.
The Right Way to Deep Clean Your Upholstery
Alright, now for the part where the real work—and the real magic—begins. You’ve prepped your couch and have your tools lined up. It's time to get into the deep-cleaning process that the pros use, but simplified so you can easily do it yourself. This is how you’ll finally lift out all that deep-down grime and bring your sofa back to life.
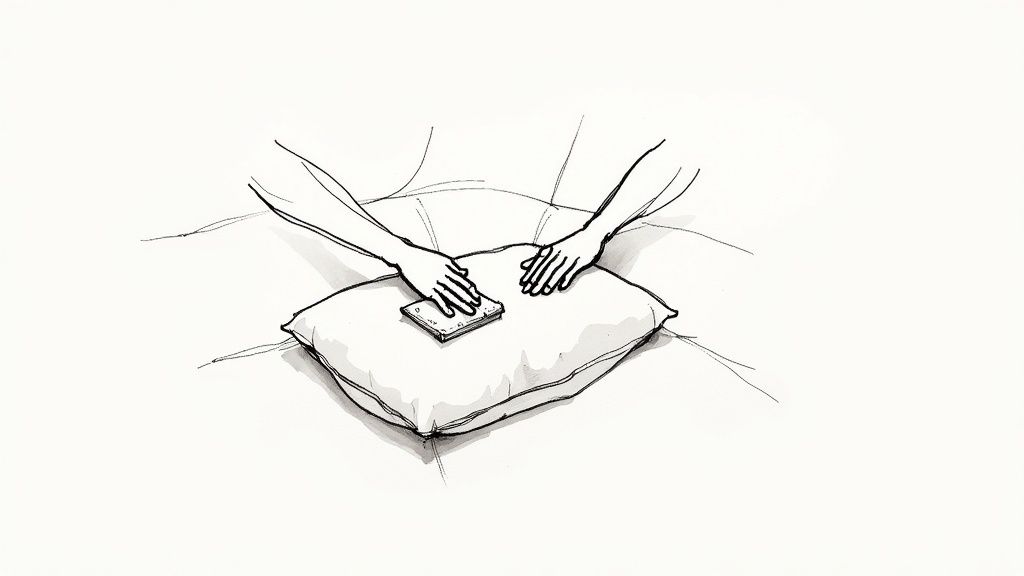
Before you spray anything, the single most important rule is to spot-test your cleaning solution. Find a small, hidden area, like under a cushion or on the back of the couch near the floor. Apply a tiny amount of your cleaner, let it sit for a minute or two, and then blot it dry. You'll want to wait until it's completely dry to check for any color bleeding or weird reactions with the fabric. Trust me, this five-minute test can save you from a massive, irreversible mistake.
Applying Your Cleaner Correctly
When it comes to cleaning upholstery, how you apply the cleaner is just as critical as the cleaner itself. The goal is to clean the fabric fibers without soaking the foam or padding underneath. If that inner material gets wet, you’re asking for mold, mildew, and a musty smell that will never leave.
So, the key is to mist, not drench.
Lightly spray your cleaning solution over a small, manageable section at a time—think a two-by-two-foot area. Working in small patches like this gives you enough time to work the cleaner in and blot it all up before it has a chance to soak through or dry on the surface.
Never, ever pour a cleaning solution directly onto the fabric. Over-saturating the upholstery is the number one mistake I see people make, and it causes water rings and fabric damage that are nearly impossible to fix. Always use a spray bottle to apply a fine, even mist.
This controlled approach makes sure you're only cleaning the part that actually needs it: the fabric itself.
Working the Solution into the Fibers
Once a section is lightly misted, grab your soft-bristled brush. You’re going to gently work the solution into the fabric using small, circular motions. If your fabric has a noticeable grain or "nap," it's best to brush in that direction.
You're not trying to scrub the life out of it. The idea is just to help the cleaner break down all the dirt and oils that have been ground into the fibers over time. Think of it like shampooing a carpet—you want to lift the grime to the surface so you can easily wipe it away.
Be patient and methodical here. It’s better to go slow and steady, working one small section at a time, to tackle that overall dinginess from everyday life.
It's clear people are paying more attention to keeping their homes truly clean. In fact, post-pandemic trends show a massive demand for professional cleaning services. The global market for carpet and upholstery cleaning is projected to hit an incredible USD 120.8 billion by 2035. This really highlights how much we've all started to prioritize hygiene in our living spaces. You can read more about these upholstery market trends if you're curious about what's driving the industry.
The Art of Effective Blotting
Now for the best part: pulling all that gunk out. Take a clean, dry microfiber cloth and press it firmly into the section you just agitated. This is called blotting, and it’s absolutely crucial. You are literally transferring the dissolved dirt and cleaning solution from your couch onto the cloth.
Whatever you do, don't rub or wipe. That just smears the dirt around and can push it even deeper into the fibers, which is the last thing you want.
Instead, just press down firmly, lift the cloth, and move to a clean spot on it for the next press. You’ll probably be horrified (and a little satisfied) by how much dirt comes up. Keep blotting until the area just feels damp, not soaking wet, and your cloth starts coming up clean.
Once you’re done with that section, move on to the next and repeat the whole mist-brush-blot process until you've covered the entire piece of furniture.
How to Tackle Tough Stains and Spills
Look, even if you’re diligent with deep cleanings, life happens. Someone knocks over a glass of red wine at a party, or that greasy slice of pizza takes a nosedive onto your favorite cushion. It can feel like a total catastrophe for your couch.
But here’s the thing: most of these spills can be handled before they become a permanent fixture. The real secret is to act fast.
When a spill happens, your first instinct needs to be blot, not rub. Seriously. Grab a clean microfiber cloth and just press it onto the fresh spill. Your goal is to soak up as much as you can.
If you rub, you’re just grinding that stain deeper into the upholstery fibers, making your job ten times harder.
Emergency Response for Common Stains
Different spills need different battle plans. Having a quick guide handy can save you precious minutes when you’re in a panic trying to figure out what to do. Here are a few tried-and-true methods for the usual suspects.
- Red Wine Spills: After you’ve blotted, dump a generous amount of salt on the fresh stain. The salt will literally pull the wine out of the fabric. Let it sit for a few hours—or until it turns pink—then just vacuum it all up.
- Coffee or Tea Stains: Mix equal parts white vinegar and water in a spray bottle. Give the stain a light mist, let it sit for about 10 minutes, and then blot it like crazy with a clean, dry cloth.
- Grease and Oil Stains: Get on this one immediately. Sprinkle cornstarch or baking soda right onto the spot. These powders are amazing at absorbing oil. Let it sit for 15-20 minutes, then vacuum it away. If a little mark remains, you can treat it with a dab of dish soap on a damp cloth.
For those really stubborn spots, the techniques are often a lot like what you’d use on other surfaces in your home. Many of the same rules apply. You can find more great tips in our guide on the best way to get spots out of carpet, and most of them can be adapted for upholstery.
Tackling Pet Accidents and Odors
Pet accidents are a double-whammy. You get the stain, plus that lingering odor that just doesn’t want to go away. The key here is an enzymatic cleaner. These things are designed to literally break down the organic proteins in urine, destroying the source of the smell instead of just covering it up.
First, blot up as much of the mess as you can. Then, really saturate the area with an enzymatic cleaner (but always test it on a hidden spot first!). Let it sit according to the product's directions—this can often be for several hours—so the enzymes can do their job. Blot it dry and let the area air out completely.
Don't skip this. If any of those odor-causing bacteria are left behind, your pet is much more likely to mark that same spot again.
When to Wave the White Flag
Some stains are just plain brutal. We’re talking permanent markers, heavy ink spills… things that can be nearly impossible to remove yourself without damaging the fabric.
If you’ve tried a targeted approach and the stain isn’t budging, it’s usually best to stop before you accidentally make it worse. This is the time to call in a professional. They have access to specialized solvents and equipment that can tackle the most stubborn stains safely.
Your Top Couch Cleaning Questions, Answered
Even when you have a solid plan, questions always come up when you’re elbow-deep in couch cleaning. It's one thing to read a guide, but it's another thing entirely to know what to do when you hit a real-world snag. Let's dig into the most common questions people ask about keeping their sofas looking and smelling fresh.
Think of this as your go-to troubleshooting guide. These are the little nuggets of experience that take you from just cleaning your couch to truly maintaining it like a pro.
How Often Should I Really Be Deep Cleaning My Couch?
This is the big one, and honestly, the answer comes down to your lifestyle. For an average household, giving your couch a thorough deep clean every six months is a fantastic rule of thumb. That’s usually enough to tackle the slow buildup of dust, allergens, and skin oils from everyday life.
But, you’ll want to ramp that up if:
- You’ve got pets who think the couch is their personal throne.
- Little kids are using it as their snack-time headquarters.
- Someone in the family deals with allergies or asthma.
In those situations, you're better off deep cleaning every three to four months. It's the best way to keep your upholstery truly hygienic and stop it from looking dingy.
A huge mistake I see people make is waiting until the couch looks dirty. By that point, all that grime has worked its way deep into the fibers, and the cleaning job becomes ten times harder. Staying on a regular schedule is just so much more effective.
What Do I Do About Lingering Odors?
Stubborn smells from pets, spilled food, or just that general "lived-in" funk can really stick around. If a deep clean didn't quite knock out the odor, your next best friend is a box of baking soda.
Sprinkle it generously all over the fabric and just let it sit. Give it a few hours at least, but leaving it overnight is even better. Baking soda is a powerhouse at absorbing those trapped smells. When it's done its job, just vacuum it all up with your upholstery attachment. For stubborn pet odors, though, an enzymatic cleaner is a must-have; it actually breaks down the organic stuff causing the smell in the first place.
When Is It Time To Call a Professional?
Knowing when to throw in the towel and call for backup is crucial. You don't want to turn a small problem into a permanent one. If you’ve been working on a tough stain and it’s just not budging, stop. Don't keep scrubbing. This is especially true if you’re dealing with delicate fabrics like silk or velvet, or if your couch has a dreaded 'X' cleaning code (which means vacuum-only).
You should also bring in a pro if you're facing widespread water damage or a serious mold and mildew problem. They have powerful, specialized equipment and solutions that can tackle massive issues without ruining your couch in the process.
Ready to skip the DIY headache and let the experts take over? The team at Citrus Carpet Cleaning Buford uses a low-moisture, citrus-based method that gets your upholstery fresh, clean, and dry in just 1-2 hours. Get your free "EXACT-imate" today!